Checkout is paused for a short while for maintenance. Your cart is saved: please check back soon.
Help topic 3 of 10
Add your products
Each product needs a name, an item type, a price and stock. Good photos sell: add up to six.
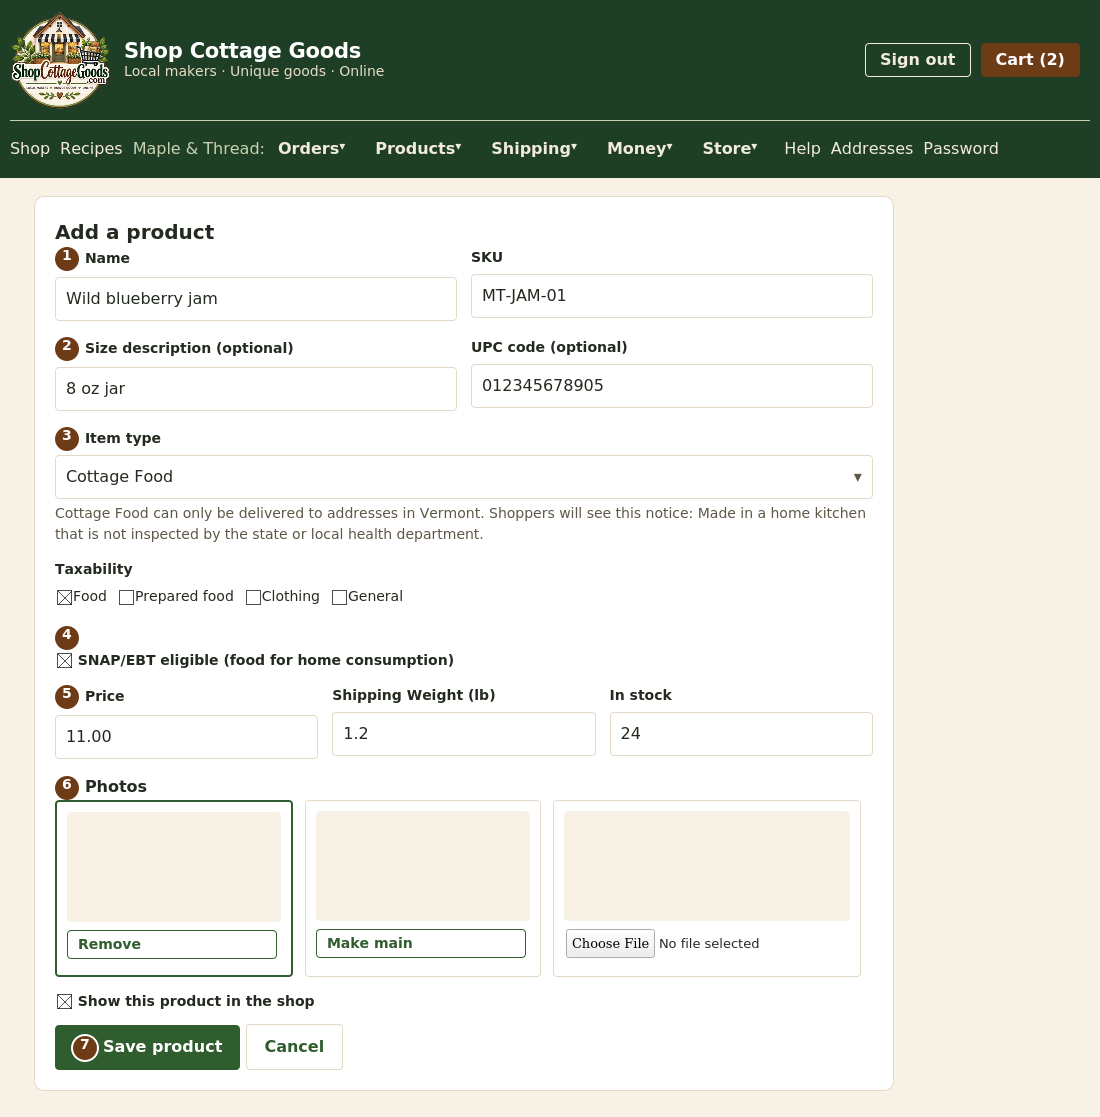 The numbers match the steps below. Select the picture to see it full size.
- Enter the name shoppers see and a SKU, your own product code.
- Optional: a size description shoppers see (like 8 oz jar) and the UPC code under the barcode. Shoppers can search the shop by UPC.
- Choose the item type. Cottage Food can only be sold to shoppers in your home state, and shoppers see the cottage food label statement. The type also fills in the taxability boxes; change them only if this product is taxed differently.
- For food sold for home consumption, tick SNAP/EBT eligible if it qualifies (not hot or prepared food). Shoppers see the badge once the marketplace has confirmed your SNAP authorization.
- Enter the price, the shipping weight in pounds (packed, used for weight-based and live shipping prices) and how many are in stock. Stock goes down as orders arrive.
- Add up to 6 photos (JPEG, PNG, WebP or GIF, up to 5 MB each). The first is the main photo; use Make main to change it. Photos are turned upright and resized for you, and their hidden location data is removed.
- Select Save product.
Browsing your store from a product page
At the top of each product page, shoppers see ‹ and › arrows with the names of the products
before and after, and where they are (for example 3 of 12 from Michigan Mixes). The arrows follow your store's order: your featured
product first, then your Order numbers, then newest. They go round from the last product back to the first, and the
keyboard's left and right arrow keys work too. Products that aren't in the shop are skipped.
New and spice level badges
Tick New on the product form to show a gold NEW starburst on the product's picture, in the shop and on its page.
Choose a Spice level (Mild, Medium or Hot!) to show a green, orange or red starburst too. Untick New when it's
no longer new; set the spice level to None for products that aren't spicy. Your products list shows the same badges.
Display order and your featured product
When shoppers look at your store (choosing it in the shop, or tapping your store's name on a product page), they see your products in
your order. On Your products, type numbers in the Order column (1 first) and tap
Save order and label. Products without a number follow, newest first. Leave gaps (10, 20, 30) to slot new products in
later. When shoppers look at all stores together, the newest products come first.
Tap Feature on one product to put it first, larger, with a short description and a label, Product of the month
unless you type your own (for example, Seasonal favourite). It shows only when shoppers look at your store, and only if it's
in the shop and matches what they searched for. Tap Unfeature to stop, or feature another product instead.
Putting a product on sale
On the product form, tick On sale and enter the Sale price (less than the regular price). Shoppers
pay the sale price, and see it beside the regular price crossed out, with Save and the amount, in the shop, on the product
page and in their cart. Savings shown to shoppers fills in from the two prices; you can change it to show a different
amount, for example rounding $1.51 to "Save $1.50". That's for display only: shoppers always pay the sale price. Promotions still
apply on top of the sale price.
Sale dates: add a First day and Last day to start and end the sale by itself. Both days
are included, by the marketplace's local date. Leave the first day blank to start now, and the last day blank to run until you untick
On sale. Your product list shows each sale's status, like Sale starts Nov 1 or On sale until Oct 31, and
shoppers see Sale ends with the date on the product page. Untick On sale to end a sale early; the sale price and dates
are kept for next time.
Preparation instructions
Below the description, add Preparation instructions (how to prepare or use the product, one step per line) and, if
there's another way, Alternate preparation (say, slow cooker instead of stovetop). Shoppers see them on the product's page
under Preparation.
Related products
Under Related products on a product's form, tick up to 8 of your other products that go well with it (a jam with
the scones it suits, say). They show at the bottom of the product's page as small pictures that link to each product.
Below them, Customers also bought fills in by itself from orders: products shoppers often buy together with this one.
Recipes
Share recipes that use your products under Recipes in your store menu. Write the ingredients one per row and the
steps one per line (they're numbered for you), and add a photo once it's saved. Use Link to my product on an ingredient,
and shoppers can open that product or add it to their cart straight from the recipe; the product's page then lists the recipe too.
Tick Published to show a recipe in the shop.
Food details
For food item types, the form asks for the ingredients (as on your label, most first), what the product contains
(tick any of the nine major allergens: milk, eggs, fish, crustacean shellfish, tree nuts, peanuts, wheat, soybeans and sesame, and list others)
and what it may contain (allergens used in the same kitchen). Shoppers see them on the product page under
Ingredients and allergens. Keep them matching your label.
Options (flavours, sizes, gift wrap)
Let shoppers choose, for example "6 cookies: 2 chocolate chip, 4 oatmeal" or "add a gift box". After saving a product, select
Edit on it and scroll to Options.
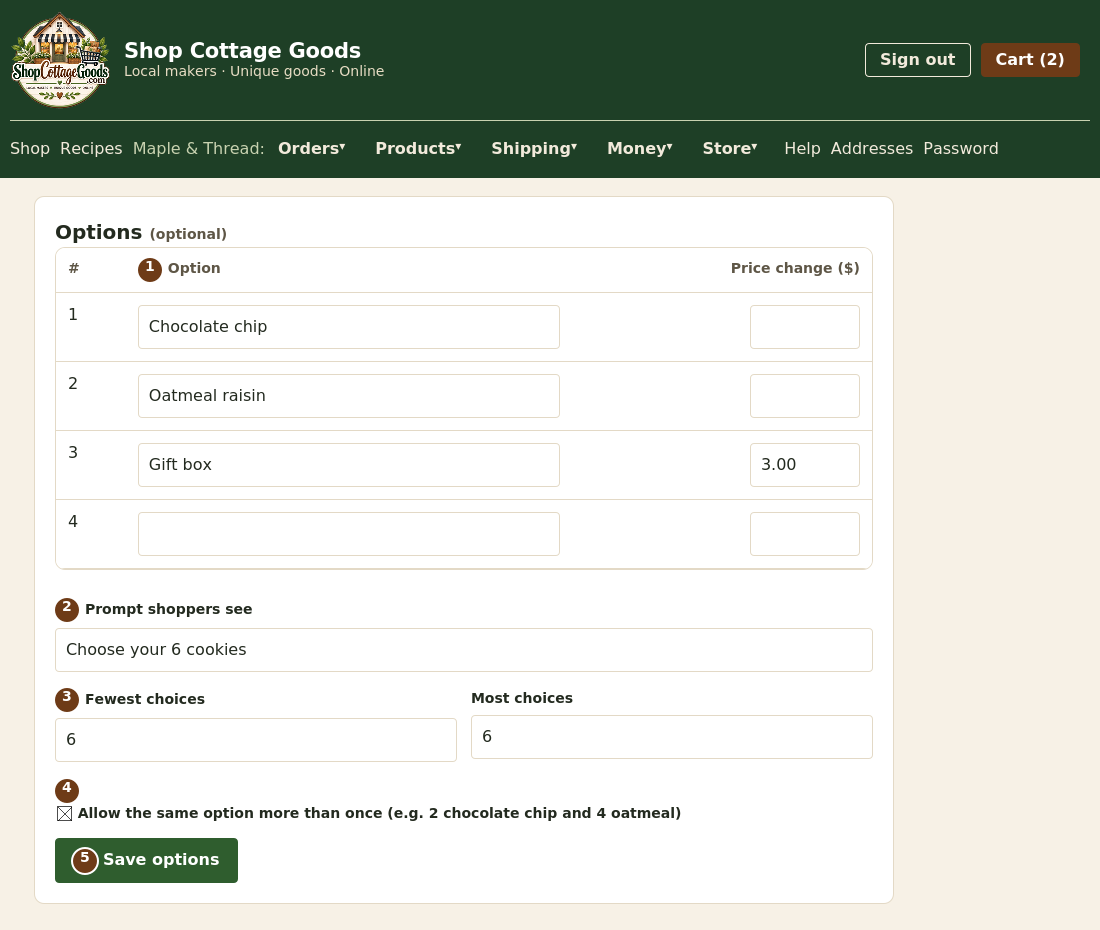 The numbers match the steps below.
- Enter up to 15 options, each with an optional price change (3.00 adds $3.00; -2.00 takes $2.00 off). Leave a row empty to remove an option.
- Write the prompt shoppers see above the options.
- Set the fewest and most choices. The same number makes it exact, like 6 and 6 for "choose 6".
- Tick Allow the same option more than once to let shoppers pick quantities; otherwise they tick different options.
- Select Save options. In the shop, the product now shows Choose options, and it can't go into a cart until the right number is chosen.
Your orders show exactly what was picked.
Options that are your own products
For a box or bundle, like Pick any 3 jams, choose one of your products in an option's Product column; its name fills
in (you can change it). Then, when shoppers choose that option, the product's own stock goes down too: two boxes with Strawberry twice use 4
jars of Strawberry. The box keeps its own stock as before (set a high number if boxes aren't limited). Products set to Not in shop
work well here, so single jars can be sold only in boxes.
When a product runs out, its option shows Sold out and can't be chosen. If it sells out while it's in a shopper's cart,
they're asked to choose again before checking out. Cancelled, refunded or unpaid orders give the stock back. Options that aren't products
(like gift wrap) work as before, and empty option rows are never shown to shoppers.
Selling when out of stock
Tick Keep selling when out of stock under In stock for a product you can always make more of. Shoppers can still buy
it, on its own or as an option, and its stock goes below 0, shown in red on Your products so you know how many to make. To stop, untick it
and enter how many you have.
Deleting and hiding products
- Delete (on your products list) is offered only for products that have never been sold. It removes the product and its photos for good.
- A product that has sold can't be deleted, because past orders refer to it. Select Hide instead: it leaves your list and the shop, but stays in past orders.
- Tick Show hidden products to see hidden ones again, and select Unhide to bring one back to your list. It returns to the shop when you edit it and tick Show this product in the shop.
- To stop selling something for a while without hiding it, untick Show this product in the shop: it shows as Not in shop on your list.